📸 Photo Description
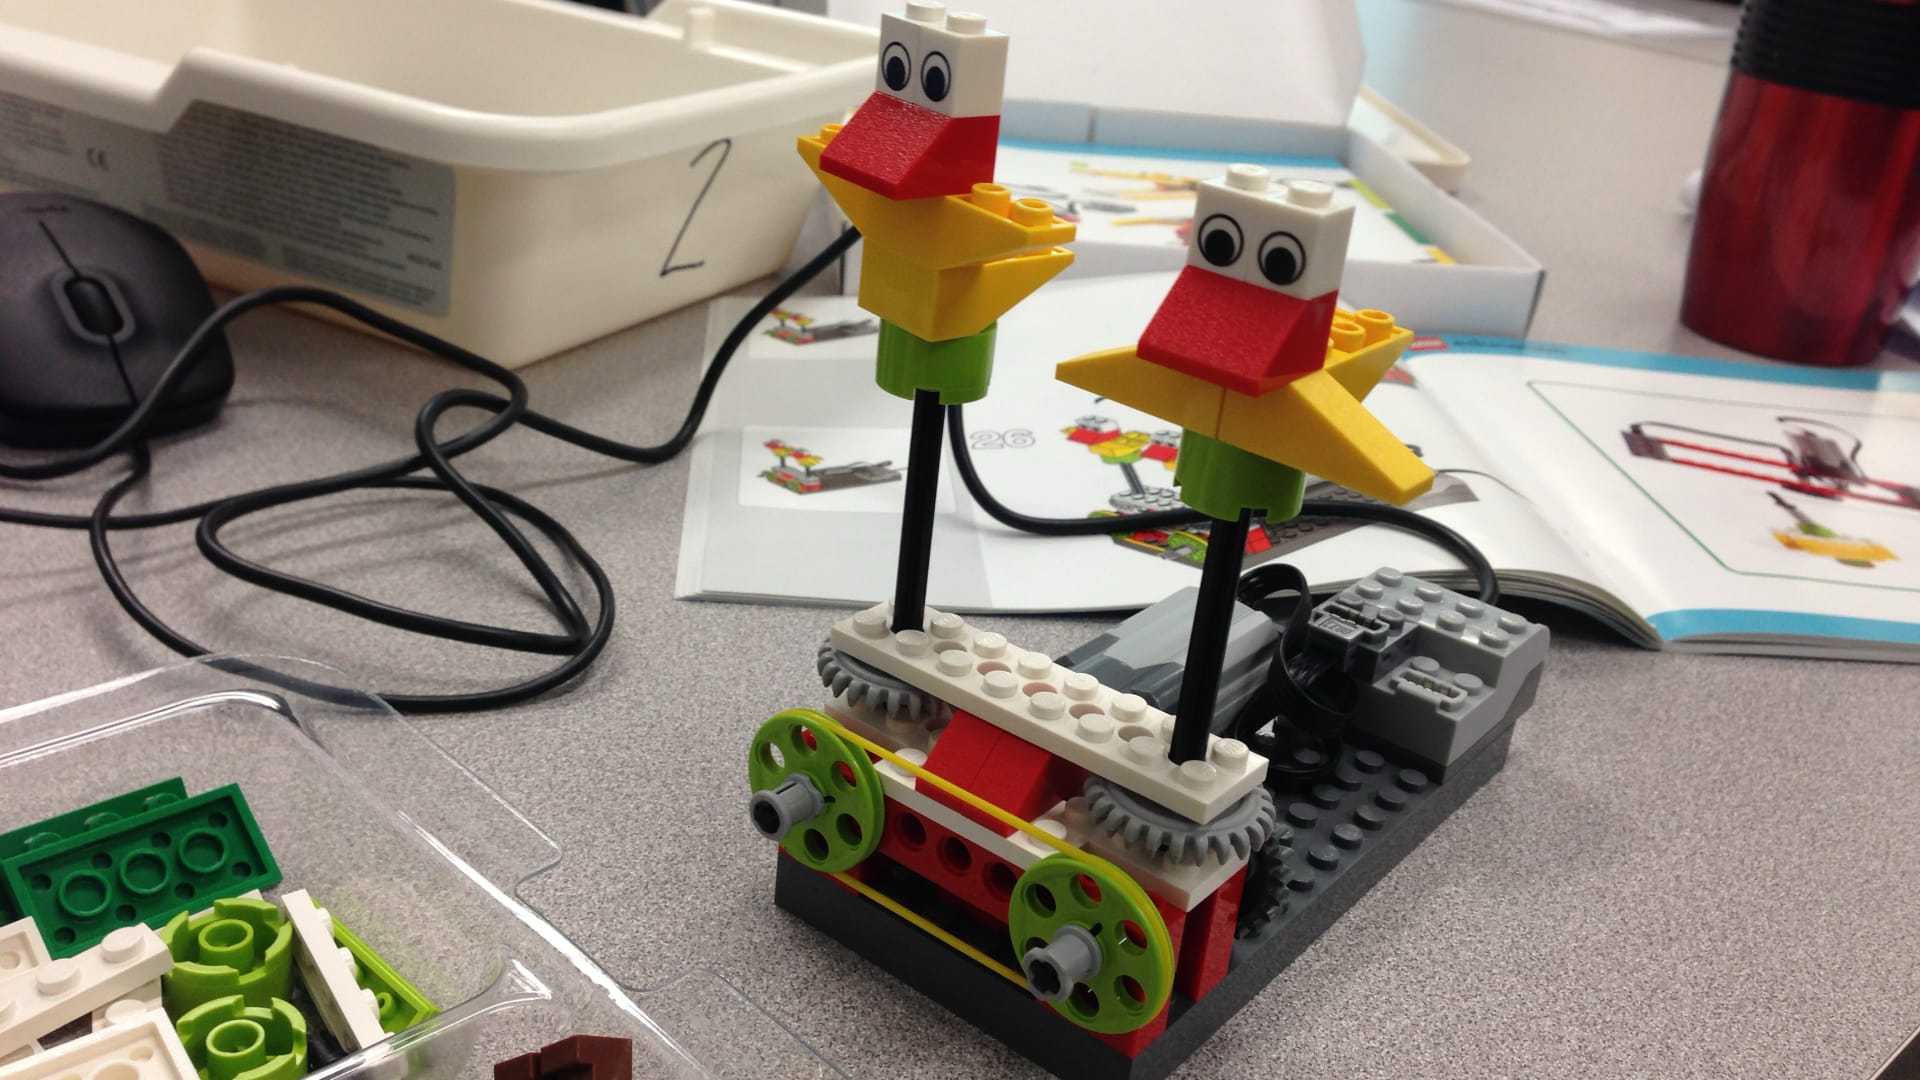
This image shows a hands-on engineering project where colorful LEGO structures—including animated characters with moving parts and wheels—are connected to computer programming controls. Two tall bird-like figures with red and yellow blocks stand next to a wheeled vehicle with green gears, all built from construction materials. A computer mouse and USB cable connect the models to technology, suggesting students are learning how to make their creations move through instructions and design.
🔬 Scientific Phenomena
The anchoring phenomenon here is mechanical motion controlled through design and force application. When students build these LEGO structures and program them, they are creating objects that respond to pushes and pulls—either from motorized components or manual force. The wheels, gears, and articulated parts demonstrate how different design choices affect how and where objects move. The key scientific principle is that the strength, direction, and point of application of forces determine the motion of the constructed objects.
📚 Core Science Concepts
- Push and Pull Forces: The motorized wheels and moving parts in these LEGO structures demonstrate that pushes and pulls create motion. When the motor activates, it applies a force that moves the wheels and makes the entire vehicle move forward.
- Direction of Motion: The positioning of wheels, the angle of movable parts (like the bird's wings), and the design of the structure control which direction the object moves. A push from the side would move the object differently than a push from behind.
- Speed and Force Relationship: The strength of the motor's push determines how fast the wheeled vehicle travels. A stronger push creates faster motion; a weaker push creates slower motion.
- Design as a Solution: The students' choice to add wheels, motors, and specific shapes solves the problem of "how do I make this move the way I want?" This is the bridge between imagination and physical reality through engineering design.
Pedagogical Tip:
For kindergarteners, focus on the observable cause-and-effect relationship: "When we push/pull, it moves!" Rather than introducing complex vocabulary, use action words and have students physically demonstrate pushing and pulling motions. Let them feel the difference between a gentle push and a strong push on a real object before analyzing the LEGO models.
UDL Suggestions:
Multiple Means of Representation: Provide both visual (watching the motors move) and kinesthetic (letting students push/pull simple objects) experiences. Some learners benefit from manipulating the LEGO pieces themselves before observing the programmed motion.
Multiple Means of Engagement: Allow students to predict ("What will happen if...?") before seeing the motor activate. This builds curiosity and investment. Consider allowing students to manually push a simple LEGO car across a table as an alternative to the motorized version for those who process information better through direct manipulation.
Multiple Means of Expression: Accept responses through drawing, pointing, actions (pushing/pulling motions), or verbal descriptions rather than requiring only written or verbal answers.
🔍 Zoom In / Zoom Out Concepts
Zoom In — Microscopic Level:
At the smallest scale, the motor inside these structures contains electromagnets and moving coils of wire. When electricity flows through the wire, it creates an invisible magnetic force that pushes and pulls the coil, causing it to spin. This spin is transferred to the wheels or gears, creating visible motion. Students can't see the electromagnetic forces, but they can observe and feel the result!
Zoom Out — System Level:
At the larger scale, these LEGO creations are part of a complete system: the computer (which sends instructions via the USB cable), the motor (which converts electrical energy into mechanical motion), and the structure itself (which transfers that motion into observable movement). In real-world contexts, this same principle appears in toy cars, robotic arms, conveyor belts in factories, and even elevators. The push/pull forces are everywhere in our world!
🤔 Potential Student Misconceptions
- Misconception: "Things only move if I push them with my hands."
- Clarification: Objects can be pushed or pulled by many invisible forces, including motors, magnets, wind, and gravity. In this model, the motor is doing the pushing, even though we can't see the exact force. The motion still follows the same rules as when we push something ourselves.
- Misconception: "A bigger object always moves faster or slower than a smaller object."
- Clarification: The strength of the push or pull matters much more than the size of the object. A lightweight toy car with a strong motor might move faster than a heavier toy car with a weak motor. It depends on the force applied, not just the size.
- Misconception: "The direction the wheels point doesn't matter; things just move."
- Clarification: The direction of wheels and the placement of the motor determine which way the object travels. If wheels point forward, the push moves it forward. If wheels point sideways, it moves sideways. The design controls the direction!
🎓 NGSS Connections
K-PS2-1: Plan and conduct an investigation to compare the effects of different strengths or different directions of pushes and pulls on the motion of an object.
K-PS2-2: Analyze data to determine if a design solution works as intended to change the speed or direction of an object with a push or a pull.
- Forces and Motion: Pushes and pulls have different strengths and directions.
- Types of Forces and the Effect: When objects are pushed or pulled, they move. Things move in different ways.
- Simple events have obvious causes and effects; designing solutions involves cause-and-effect thinking.
- The way an object is shaped and structured affects how it functions and moves.
💬 Discussion Questions
- What do you think will happen if we add another motor to push this vehicle faster? (Bloom's: Predict | DOK: 2)
- How is the direction these wheels are pointing different from the direction the bird figures are facing, and why might that matter? (Bloom's: Analyze | DOK: 2)
- If you wanted to make this LEGO car go slower, what are some ways you could change the design or the push? (Bloom's: Create | DOK: 3)
- How is pushing this motorized vehicle different from pushing a ball across the floor with your hand? (Bloom's: Compare | DOK: 2)
📖 Vocabulary
- Push: A force applied to move something away from you or to make it go faster.
- Pull: A force applied to move something toward you or to bring it closer.
- Motor: A machine part that spins around and creates movement.
- Wheels: Round parts that spin to help something roll and move.
- Force: A push or pull that makes something move, stop, or change direction.
- Speed: How fast or how slow something is moving.
🌡️ Extension Activities
- Push and Pull Investigation Station: Set up a simple table with various objects (blocks, balls, toy cars) and have students experiment with pushing and pulling them gently and strongly. Record observations: "Gentle push = ___" and "Strong push = ___." Create a class chart showing the differences in distance traveled. This directly connects to K-PS2-1 by comparing the effects of different strengths of pushes.
- Design Your Own Movement: Provide students with craft materials (paper cups, straws, tape, play-dough) and challenge them to build a simple structure that moves when pushed or pulled. Ask: "Can you make it roll? Can you make it slide? Can you change the direction it moves?" Students test their designs and modify them based on what works—this is the engineering design cycle in action.
- Motor-Free Exploration: Create a kinesthetic station where students explore their own bodies as pushers and pullers. Use scarves, balloons, or light objects and have them practice pushing and pulling in different directions. Then, discuss how these same ideas apply to the motorized LEGO structures. This makes abstract force concepts concrete and memorable.
🔗 Cross-Curricular Ideas
- Mathematics & Measurement: Have students measure how far the LEGO vehicle travels with the motor on "low" versus "high" speed. Create a simple bar graph or use linking cubes to compare distances. This connects force strength to measurable outcomes.
- Language Arts & Storytelling: Students can create simple narratives about the LEGO characters: "The robot pushed the car fast. What happens next?" Writing or dictating short cause-and-effect sentences reinforces understanding: "When we _____ (push/pull), the _____ (object) _____ (moves)."
- Art & Design: Students sketch their own LEGO creations before building them, then compare the sketch to the real model. Did it move the way they drew it? This bridges artistic planning with engineering reality and helps students think about how design affects function.
- Social Studies & Community Helpers: Discuss people who use pushes, pulls, and motors in their jobs: delivery drivers (vehicles with motors), construction workers (pulleys and pushes), or mail carriers (pushing carts). Connect the LEGO learning to real-world applications in the community.
🚀 STEM Career Connection
- Mechanical Engineer — Designs things that move — engines, turbines, joints and gears — and works out the forces on them.
- Try it: Build a simple pulley system using string and a small object, and then experiment with how pulling on the string makes the object move up and down. (Practice: Constructing Explanations and Designing Solutions)
- Tools: CAD software, 3D printers, force sensors, wind tunnels
- Where they work: engineering firms, factories, design studios, research labs
- Meet one: Shini Somara — How air and water flow around things, worked out on a computer before anything is built.
- Median pay: /year — "Mechanical engineers"
- Electrical Engineer — Designs the circuits and systems that move electricity where it is needed.
- Try it: Connect a battery to a small motor and observe how it spins, then try adding a switch to control when the motor turns on and off. (Practice: Constructing Explanations and Designing Solutions)
- Tools: oscilloscopes, circuit boards, multimeters, simulation software
- Where they work: power companies, electronics firms, research labs, universities
- Meet one: Danielle George — The radio receivers that let giant telescopes hear signals from space.
- Median pay: /year — "Electrical engineers"
- Robotics Engineer — Builds machines that sense their surroundings and act on what they find.
- Try it: Design a simple robot arm using craft sticks and fasteners that can pick up a small object, and then test how well your design works. (Practice: Constructing Explanations and Designing Solutions)
- Tools: microcontrollers, motors and servos, sensors, programming environments
- Where they work: robotics companies, factories, research labs, universities
- Meet one: Shini Somara — How air and water flow around things, worked out on a computer before anything is built.
- Median pay: /year — "Engineers, all other"
Wage figures are median annual wages for the U.S. occupation named after each one, from the U.S. Bureau of Labor Statistics, Occupational Employment and Wage Statistics (OEWS), national, May 2025. Several careers share one occupation, so their figures match.